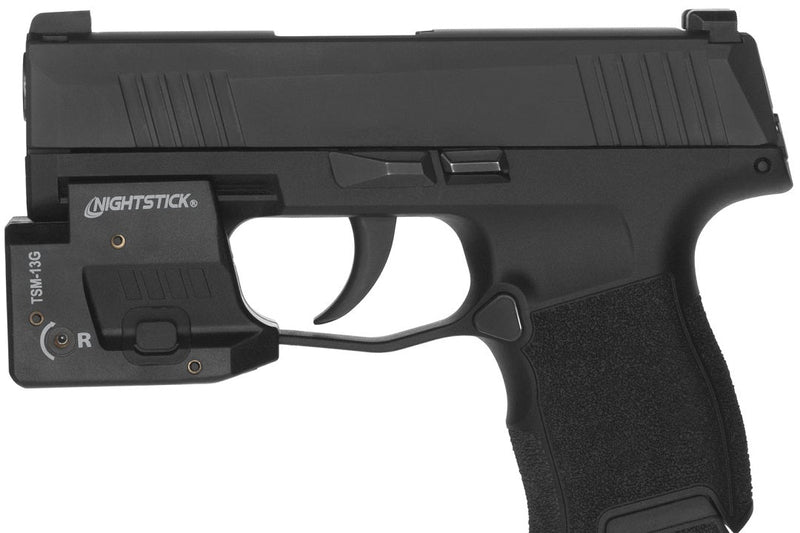


Where to mount a weapon light is a tricky decision. It affects your natural point of aim, your ability to maintain a firing grip under stress, your target acquisition speed, and how the light interacts with your sightline when it matters most.
Most shooters invest time choosing the right weapon lights or gun lights, but give far less thought to whether the mounting position actually serves their technique, platform, or mission profile. That gap can reduce performance at the range and create serious disadvantages in defensive or duty situations.
This guide breaks down weapon light placement by platform, switch access, and user role so you can make a decision based on how the light will actually be used.
Not sure which light fits your setup? Nightstick’s LIGHT FINDER® tool lets you filter by platform, output, and mounting configuration so you spend less time sorting specs and more time focused on the right tool for your mission.
Why Weapon Light Placement Matters
Compact weapon lights in the wrong position introduce trade-offs that no lumen rating can fix:
-
Recoil Management: A light mounted too far forward on a long gun shifts the balance point, increasing felt recoil and reducing control on follow-up shots.
-
Sight Picture Interference: A light positioned too close to the bore axis on a handgun can create shadow wash or bloom that degrades your sight picture under high-output conditions.
-
Grip Interference: On pistols, a light body extending past the trigger guard compromises the firing hand’s grip index and affects muzzle control.
-
Activation Under Stress: A switch that isn’t indexed to your support hand under a firing grip requires a grip shift to activate, introducing delay when you can least afford it.
The goal is a configuration where the weapon light integrates naturally into your shooting technique.
Weapon Lights Placement by Platform
Proper weapon light placement affects visibility, balance, switch access, and overall firearm control. The right mounting position allows faster target identification without interfering with grip, movement, or weapon manipulation.
Handguns: Rail Position and Fit
Most duty and defensive pistols feature a Picatinny or MIL-STD-1913 rail forward of the trigger guard. Fit within that space determines performance. Three factors drive the decision:
Flush Fit vs. Extended Profile
A compact handgun light that sits flush with the muzzle end of the frame maintains balance and reduces snag risk in a holster draw. An extended profile adds leverage on the rail interface with no performance return.
Switch Access
The activation switch must be reachable by the support hand thumb without breaking the firing grip. If your thumb travels more than one position forward from your natural index, the light’s form factor isn’t matched to your grip.
Using LIGHT FINDER®, you can identify the right rail insert based on the make and model of the pistol. This ensures that the switches of the weapon light are outside the trigger guard and the light fit is in its ideal spot on the tactical rail.
Holster Compatibility
Your light determines your holster. A mounted pistol light must interface with your carry holster before that configuration goes into rotation. Reliable compact weapon lights should integrate cleanly with both the firearm platform and the intended carry system.
Rifles and Carbines: Fore-End Position and Access
On an AR-platform, patrol rifle, or carbine, where you mount the light on the fore-end is as important as which light you choose.
-
Forward Mounting: Maximizes beam throw and keeps the light body clear of your support hand grip. This is the preferred position for structure clearance and low-light room entry.
-
Mid-Rail Mounting: Positions the switch closer to the support hand’s natural grip index for faster momentary-on activation. This is preferred for patrol, field use, and transitions between carry and firing positions.
-
12 O'Clock (Top Rail): Aligns the beam with the bore axis and your optic’s line of sight. This is best when there isn't an optic occupying the top rail.
-
3 or 9 O’Clock (Side Rail): This is preferred when an optic is on the top rail. Keep the support hand thumb on the switch without breaking the grip. Use long gun lights designed with a side-accessible switch for this configuration.
Shotguns: Balance, Recoil, and Switch Access
The felt recoil on a shotgun is substantially higher than that of a carbine, and weight distribution directly affects firearm recovery between shots. Mount the light as far rearward on the fore-end as the rail allows while keeping the switch accessible to the support hand.
On pump-action platforms, confirm the light body does not contact the receiver during the pump stroke, which is a reliability issue, not an ergonomic preference.
The best light position is one that supports consistent activation, maintains balance, and fits your shooting style. Always test the setup with your holster, sling, and normal shooting movements before putting it into use.
Switch Type and Activation Techniques of Best Weapon Lights
Switch designs directly affect how efficiently compact weapon lights perform under stress. The best configurations allow immediate activation without forcing the shooter to break grip, adjust hand placement, or shift focus away from the target.
Momentary-On Activation
Momentary-on (press-and-hold) is the preferred mode for defensive, duty, and tactical use. It provides controlled bursts of illumination while minimizing unnecessary light exposure and preserving positional awareness.
Because the light deactivates as soon as pressure is released, shooters maintain greater control over light discipline during movement, target identification, and room clearing. Many high-performing Nightstick weapon lights prioritize momentary-on activation for this reason.
Constant-On Activation
Constant-on mode is better suited for extended searches, structure inspections, administrative tasks, or situations where continuous illumination is necessary.
While effective in prolonged low-light environments, constant activation increases the visible light signature and should be used deliberately in defensive applications.
Switch Placement and Grip Consistency
Regardless of platform, the switch should align naturally with your support-hand thumb or firing-hand index without requiring conscious adjustment. If activation forces you to shift grip position or alter hand pressure, the setup will slow response time and reduce consistency under stress.
Before finalizing any mounting configuration, test switch access during dry-fire repetitions, reloads, and movement drills. Properly positioned weapon lights should activate instinctively as part of the firearm’s normal handling cycle.
Weapon Lights Mounting Considerations by User Role
Different users require different weapon light configurations based on how the firearm is carried, deployed, and used under stress. The ideal setup balances switch access, mounting position, output, and compatibility with the user’s operational needs.
Law Enforcement and Armed Security
Duty professionals from law enforcement and armed security need reliable weapon-mounted lights that integrate with approved holsters and perform consistently during extended shifts. Placement should prioritize fast switch access, secure retention, and dependable illumination under high-stress conditions.
Concealed Carry License Holders
CCW (Carry Concealed Weapon) users need low-profile setups that maintain concealment without affecting draw speed or comfort. Many carriers prefer compact weapon lights with a flush-fit design that minimizes printing while preserving natural switch access and holster compatibility.
Home Defense and Patrol Users
Home defense and patrol setups benefit from higher-output weapon-mounted lights capable of illuminating rooms, hallways, and exterior areas. Placement should support quick activation, balanced handling, and beam performance suited for close- to mid-range positive identification (PID).
The best mounting setup is the one that supports your environment, carry method, and response style without compromising firearm control or accessibility. Always test the configuration during dry-fire and movement drills before relying on it operationally.
Common Weapon Lights Placement Mistakes and How to Avoid Them
Even high-quality weapon lights can underperform when mounted incorrectly. Poor placement affects switch access, firearm balance, holster compatibility, and reliability under recoil.
Avoiding these common setup mistakes helps ensure the light functions as an integrated part of the firearm rather than an added accessory.
-
Mounting for Aesthetics Instead of Ergonomics: A visually centered light means nothing if the switch cannot be activated naturally. Always prioritize grip index, switch reach, and firearm control over appearance.
-
Skipping Holster Verification: Any change in light model, rail position, or mounting hardware requires holster re-testing before carry for duty use. Improper fit can slow the draw or compromise retention.
-
Ignoring Hardware Torque Specifications: Recoil vibration gradually loosens improperly secured mounting screws. Periodically inspect and re-torque hardware to prevent movement, beam shift, or switch inconsistency.
-
Using the Same Placement across All Platforms: A setup that works on a handgun may not function effectively on a rifle or shotgun. Evaluate each platform independently based on grip style, recoil, and intended use.
-
Positioning the Light too Far Forward: Excessively forward placement can make switch activation difficult and increase impact damage risk around barricades or doorways. Properly mounted gun lights should remain easy to activate.
-
Blocking Support-Hand Movement: Poorly placed lights can interfere with grip transitions, sling use, pump operation, or barricade positioning. The light should support firearm manipulation, not restrict it.
-
Ignoring Beam Obstruction: Incorrect mounting can cause barrel shadowing, suppressor shadow, or interference from front sights and accessories. Test beam projection in low light before finalizing the placement.
The most effective setup is one that remains reliable, intuitive, and comfortable during real-world use. After mounting the weapon lights, confirm performance through dry-fire practice, reloads, movement drills, and low-light testing to ensure the configuration works under stress.
Find the Right Nightstick Weapon Light for Your Setup
Nightstick’s weapon light lineup is built around the operational needs of law enforcement, armed security professionals, first responders, and serious defensive carriers. Every light is engineered with practical field performance in mind, including intuitive switch placement, durable mounting interfaces, dependable runtime, and sustained illumination under recoil and demanding conditions.
What sets Nightstick apart:
-
Engineered for professional-duty and defensive applications
-
Designed for compatibility across handgun, rifle, and shotgun platforms
-
Trusted by law enforcement agencies and public safety professionals
-
Built with durable aerospace-grade materials for long-term reliability
-
Configured for natural switch access and fast activation under stress
-
Supported by a lineup of holster-compatible handgun lighting solutions
Whether you are outfitting a concealed carry pistol, patrol rifle, or home-defense shotgun, selecting the right compact weapon lights involves more than lumen output alone. Mounting position, switch ergonomics, beam pattern, and platform compatibility all play a critical role in real-world performance.
Not sure which model fits your firearm? Use the Nightstick LIGHT FINDER® tool to quickly identify compatible weapon lights based on your platform and application requirements.
Nightstick’s support team can also help you choose the right setup for your firearm, holster configuration, and operational needs. Get in touch to find the best Nightstick weapon light for your application.
Frequently Asked Questions (FAQs)
How do I choose the right weapon light for my firearm?
The right weapon light depends on your firearm platform, intended use, holster compatibility, and preferred switch style. Handguns, rifles, and shotguns each require different mounting positions and beam characteristics for optimal performance.
Will a mounted weapon light fit my existing holster?
Not always. Adding or changing a weapon light can affect holster retention and draw clearance. Always confirm holster compatibility before carrying or deploying the firearm.
What lumen output is best for defensive or duty use?
Most defensive and duty setups benefit from at least 500 lumens to effectively identify targets in low-light environments. Higher-output models may be preferred for outdoor, patrol, or long-gun applications.
Are Nightstick weapon lights durable enough for professional use?
Yes. Nightstick weapon lights are engineered for law enforcement, public safety, and defensive applications with durable construction, recoil resistance, and dependable switch performance under demanding conditions.
How can I find the correct Nightstick light for my setup?
The Nightstick LIGHT FINDER® tool helps match compatible lights to your handgun, rifle, or shotgun platform. You can also contact the Nightstick support team for personalized product recommendations based on your application and carry setup.
Where should a weapon light be mounted on a handgun?
A weapon light should be mounted on the pistol’s accessory rail in a position that allows a natural switch activation without changing your firing grip. Flush-fit or near-flush placement is typically preferred for better balance, reduced snag risk, and improved holster compatibility.
Are compact weapon lights better for concealed carry?
Yes. Compact weapon lights are generally better suited for concealed carry because they reduce printing, improve comfort, and fit more holsters than full-size models. They also maintain better balance while still providing sufficient illumination for defensive use.